Blasphemous 2 – Boss Guide
Blasphemous 2 has its share of difficult bosses, ranging from grotesque monstrosities to nimble warriors that match your strengths as the legendary Penitent One. They’re not as crushing as the bosses from the first game, but they still pack quite a punch that could have you repeating the same encounter over and over if you don’t take notice.
In this guide, we will be outlining the first nine bosses of Blasphemous 2 – their patterns, their strengths and weaknesses, and the best strategies you can use to defeat them.
Choose your weapon, Penitent One, and we shall defeat these horrors for penance!
Blasphemous 2 Boss Guide
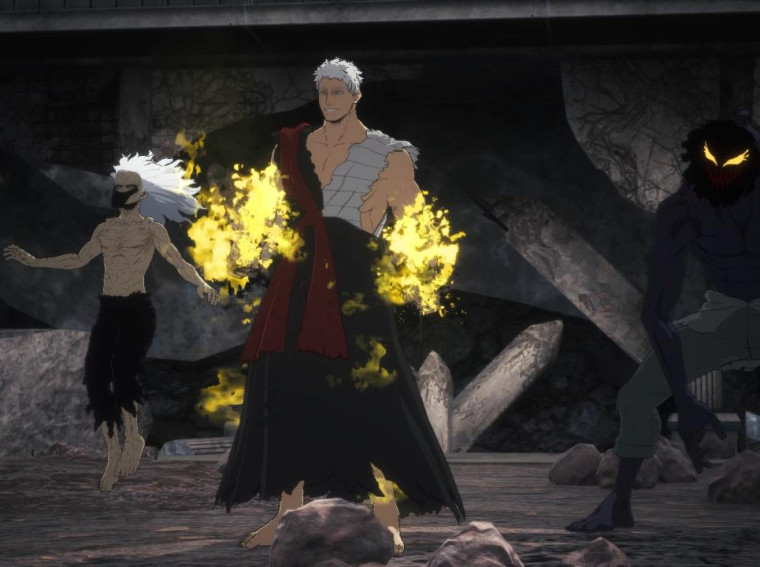
Faceless One – Chisel of Oblivion
Just as you choose your weapon to start with, you face off against the Faceless One before even starting Blasphemous 2. Personally, I would use the war censer, Veredicto, for this enemy. The scimitar, Ruego Al Alba, will be a good choice too, though I find that the damage output of Veredicto will make them yield much faster.
The Faceless One has two moves: A charge attack and an air throw. They will mostly default to the air throw move, leaving them open for a few seconds to get some hits in before they pull their weapon back. They will mix it up a bit with the charge attack, but enough hits will topple this boss.
Great Preceptor Radamés
The first real boss you will face in Blasphemous 2 is also the first boss that changes up their patterns as they get close to death, which will be on the last third of their life bar.
I would use Veredicto for the damage output, and it’s easier to time the hits with his sluggish movements. I would also equip the lightning prayer you can purchase from the traveling merchant while he’s in town. Have physical defense rosary beads equipped as well, if you have them.
The first form is quite straightforward. They have two melee attacks: a quick slash and a hard smash. Mitigated, you will suffer around 30 damage for the quick slash and 70 for the smash. Use the slide to dodge these attacks. He also has some magic bolts, which you can easily dodge. He has a final charge that will leave him open for some punishment from you and your companion if you decided to avail of their help.
The second form has the first move set, but also some extra added high damage moves that may catch you off guard when you’re not careful. Rocks will cave in when they do the charge attack, and since they’re standing up, it’s much harder to jump over. They also have extra projectiles in the form of a short burst shot and a repeating ground ice attack. You can use your lightning prayer to score some cheap hits and keep hitting him until he dies.
Orospina, Lady Embroiderer
Blocking in Blasphemous 2 is a must for nimble bosses like these. Orospina has a straightforward approach, but there are ways she can instantly kill you if you’re thrown off the side.
I would use the Ruego Al Alba equipped with the Favour that allows you a longer window for blocking. If you have lightning protection, I would equip it as well. If you’re skilled at counterattacking, maybe use the Sarmiento & Centella (rapier and knife), but I’ll stick to my trusty scimitar. A good prayer to have equipped is the spiral blade as it scores some quick hits without much charge time like the lightning prayer.
Orospina has a horizontal lunge and close-quarters counter, so I would recommend blocking those, and if you get lucky, scoring a quick counterattack in the process. They will shift to an aerial lightning strike that will force you to dodge. Watch out for their telegraphed teleport slash, which can deal substantial damage if you’re not careful. Chip them when you have a chance with quick slashes and your projectiles. Watch out for their lightning lunges; either jump over them or slide away from them.
As you chip away at their life bar, their aerial projectiles grow in number as well as have multiple teleport strikes that I recommend sliding away from. As a last resort, they summon some phantoms that you have to dodge for a while before returning to the fight. They become faster and pull more tricks. Keep chipping away until victory.
Afilaor, Sentinel of the Emery
With the exception of the penultimate boss not covered in this Blasphemous 2 guide, I would say Afilaor is one of the hardest bosses in Blasphemous 2. Compared to the other bosses we’ve covered so far, he has three modes. If you don’t get the pattern down pat, he’ll make quick work of you before you even see a second form.
Just like Orospina, I would recommend the same load out, as the key with Afilaor is to get the timing right. If you can, I would equip as many physical defensive passives and Favours to mitigate the damage. Because there’s only so much you can dodge. Have the spiral projectile handy as that would net you some easy hits. If you choose to bring a companion, it’ll help you up your damage output as he is quite spongy.
His first form has a few straightforward slash attacks, where one would be a regular slash and another would have splash damage. He has a jump attack that has annoying splash damage if you let it go unchecked. His spin attack will catch you off guard, but I recommend sliding underneath it. He will also have a projectile attack that’s easily avoided.
He will eventually retreat, given enough damage from chipping away when he’s open. During this retreat, he will hurl more projectiles at you that are easily dodgeable. His splash-slash attack now has an extra projectile. He also added an annoying anti-air strike, so refrain from jumping unless you have to. He will repeat the retreat and attack pattern, so find ways to chip away at his health when you can.
His final form will be shown when his blade changes color. He will become a little more aggressive throwing larger projectiles and extending his spin attack. There are times when you’ll be dodging more of the spin attack than anything else. He will incorporate his retreat move to get some cheap slashes in, so watch out. Damage will also double, so you better dodge well, because there will be little wiggle room to heal with your bile flasks. Keep chipping away until victory.
Lesmes & Infanta
Blasphemous 2‘s pushover bosses actually start with Lesmes & Infanta. Unlike the previous bosses, you will start to improve on your damage output allowing you to overpower these bosses. While they have multiple forms, they’re not as technical as the previous bosses encountered, plus you have a few new toys to play with.
I’d use the Veredicto once again for the damage output and this time equip some anti-fire and anti-magic defensive equipment. The same spiral projectile is your friend.
The first form will be against Lesmes, he will attack using fire whirlwinds and strong bludgeon strikes. Why I went with Veredicto is that when you get a window to attack, you can make your hits really count. He leaves himself open quite a bit until he changes into his purely projectile form where you can get in between his circling flames and force some hits in. Make quick work for him and get ready for Infanta.
Infanta is a nimble and small target that charges at you with spikes and sometimes fires them. Your Veredicto will make quick work of her as the damage output is almost unfair. She will regroup with Lesmes and you will have to fight them both at full health. They will not change their attacks, so take out Infanta first and then Lesmes. This boss fight concludes the first half of Blasphemous 2.
Benedicta of the Endless Orison
The second half of Blasphemous 2 will pit you against the bosses who hold the keys to the Doves. Personally, they harken back to the bosses of the first game, but while the difficulty may be similar, your damage output and variety of defensive measures will just make you overpowered.
Benedicta is one of those bosses that remind me of one of the hardest bosses in the first Blasphemous. You only have two platforms to use and falling in the pit will cause an instant death. However, I feel that by this time you’ve gotten enough damage modifiers for Ruego Al Alba that it’s almost unfair. Still, I’d equip anti-lightning and anti-mystic beads and have the same projectiles to make quick work of this boss.
The first form of Benedicta involves her launching lightning attacks and mystic projectiles at you. The best way to damage her is when you cross over to the other platform packing multiple hits with your Ruego Al Alba. When the going gets tough, she would launch larger spikes, which I recommend dodging because of its annoying knockback. Watch out for shifting weights with the platforms as it can easily knock you out.
As your whittle her life down, she becomes more aggressive by launching more of the larger spikes in shifting directions. Sometimes, it would take up the whole screen, so I would memorize the patterns to figure out if you need to fully dodge or just sidestep to avoid instant death. Utilize your air dodge when necessary.
In her final act of desperation, she will destroy the other platform leaving you with one platform to play with. Her patterns and damage output will not change, so just make the most of your platform by chipping away when she’s close and using your projectiles when she’s out of reach.
Obòn of the Confraternity of Salt
Blasphemous 2 harkens back to the nimble fights against other Penitent Ones seen in the first game. What’s unique about Obon is how he also uses henchmen to make things harder for you. By this point, I really felt that Blasphemous 2 should’ve nerfed some of your skills because the enemy levels don’t particularly scale.
That being said, I’d equip some anti-lightning and anti-physical equipment to mitigate damage. I’d use Veredicto for crowd control and high-damage output. Finally, at this point in Blasphemous 2, you’re privy to more powerful prayers, and I use the Miasma Daggers for the multi-hit homing projectiles for crowd control and sustained high damage.
Obon is really straightforward with one actual pattern. The only thing that changes is how many henchmen he brings to the fight. Sadly, with your equipment, you can make easy work of them by just maintaining your distance and chipping away at your opponent.
He has some ground attacks, projectiles, and lunge strikes that try to keep you at bay. I’d quickly kill his henchmen to power up my fervor to launch projectiles of my own. This way, you can consistently chip away at his health. As he progresses, he’ll cast a shield enchantment on his henchmen. Double jump and air dash away when he gets too close, rinse and repeat, and before you know it, he’s dead.
Sinodo, Hymn of the Thousand Voices
Again, I’d say that at this point, Blasphemous 2 has already made you a powerhouse. Sinodo feels like a difficult boss if you’re ill-prepared. However, if you’ve been keeping up with your gear, it’ll surely be a long fight, but it will not be hard. Just like the previous boss in Blasphemous 2, switch your resistance to fire and anti-mystic. Switch your weapon to Ruego Al Alba as you can get more hits in the air. Your Miasma daggers are still your go-to projectiles.
I would aim for the head. Sinodo will change their faces and with a different face, each comes with their own elemental attack. The old man’s face uses fire attacks and area-affecting wind attacks. When he switches to the nun, it’s vertical fire and ground fire that’ll keep you on your toes. Keep dodging and hitting until he eventually changes it up.
The bug face has more erratic bullet hell-type projectiles. At this point in Blasphemous 2, I would switch to adding the Miasma daggers so I can focus on dodging while its homing nature will keep damaging Sinodo outright. He will still switch back to his previous faces including the old man default. His final face is the melting man face where he fills the screen with a fiery ground leaving you platforms to hang. Slash until he’s dead.
Susona, Fermosa Fembra
It’s quite disappointing when you’re sold on this boss in Blasphemous 2 filled with lore and a completely roundabout way of reaching, but turns out to be probably the easiest Blasphemous 2 boss. I’d say if you were not prepared, this boss will probably make quick work of you during the starting stages of Blasphemous 2. As an aerial boss, you’re better off with the Ruego Al Alba, have your Miasma Daggers, and equip anti-mystic and anti-lightning defensives.
At this point, my advice really is to just swing away. Their attacks are mostly bullet hell projectiles that do little damage with all your protections. Just watch out for the holy light and seek refuge under the platforms that manifest. Near death, they’ll then launch full-screen lightning attacks that you can bypass using the air dodge.
After Susona, you’re left with the final two bosses of Blasphemous 2. We’ll leave them to you as part of your penance!
While I wish there could be more challenging bosses in Blasphemous 2, these are what we have to contend with. They’re actually fun, but I missed the edge-of-your-seat excitement from the first game.
Blasphemous 2 is out now on the PS5, Xbox Series X, Nintendo Switch, and PC.